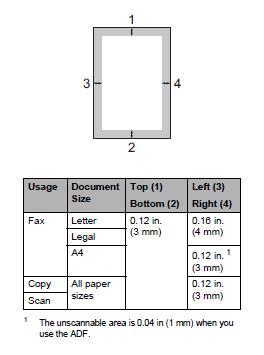
If your copy is being cut off on the left or right margins then the problem could be related to the specifications of the unit.
This machine does not scan edge to edge. Check your original. If the image is closer than the specifications listed in the table below then your image will be cut off. You will have to redo the original document and try printing again or you could try reducing the image by 90%.
To set reduction to 90%, follow these steps:
1. Press COPY.
2. Press OPTIONS.
3. Press UP OR DOWN ARROW to display Enlarge/Reduce.
4. Press ENLARGE/REDUCE.
5. Press UP OR DOWN ARROW to display Custom (25-400%).
6. Press CUSTOM (25-400%).
7. Press 9, 0 to select 90%.
8. Press OK.
9. Press UP OR DOWN ARROW to display Set New Default.
10. Press SET NEW DEFAULT.
11. Press OK.
12. Press YES.
13. Press STOP/EXIT.
Your copies may be cut off if the paper is loaded incorrectly in the Automatic Document Feeder (ADF) or paper tray, or if the paper size setting is not programmed correctly.
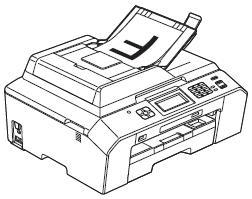
CORRECTLY LOADING THE PAPER INTO THE ADF
Regardless of the paper size you are using, you must always load the paper into the ADF so that its two shorter edges face the front and back of the ADF and its two longer edges face the left and right sides of the ADF.
In other words, you should always insert documents into the ADF face up and short edge first, as seen in the following illustration:
LOADING PAPER INTO YOUR BROTHER MACHINE'S PAPER TRAY
Regardless of the paper size you are using, you must always load the paper into the paper tray so that its two longer edges face the left and right sides of the paper tray and its two shorter edges face the front and back of the paper tray.
In other words, if you are standing in front of the paper tray, the paper should be in portrait orientation, not landscape orientation.
ADJUSTING THE PAPER TRAY FOR LEGAL, LEDGER, OR A4 PAPER
To load Legal, Ledger, or A4 paper into the paper tray, follow these steps:
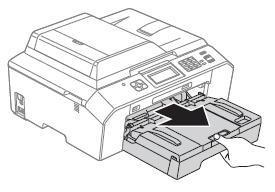
1. Pull the paper tray completely out of the machine.
2. If the paper support flap (1) is open, close it.
3. Close the paper support (2).
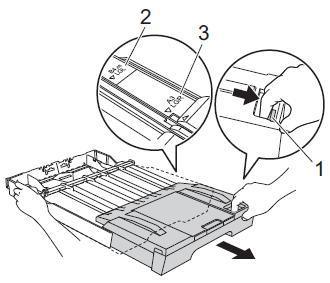
4. Press and hold the universal guide release button (1) and pull the front of the paper tray forward to extend it so that the triangular mark is aligned with the line marked Legal (2) or A3/LGR (3).
- The universal guide release button is a green button located on the front right corner of the paper tray.
5. Open the output paper tray cover (1).

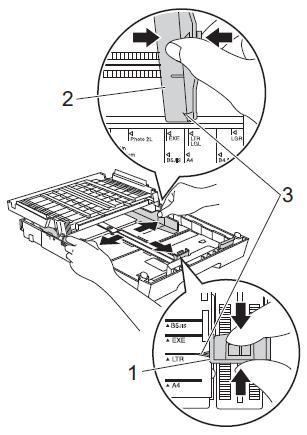
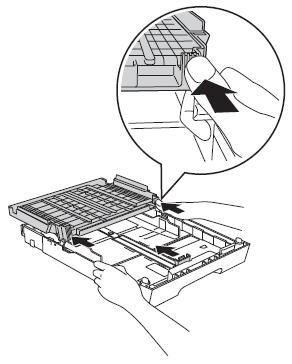
6. With both hands, gently press and slide the paper length guide (1) and paper side guides (2) to fit the paper size you are installing.
- The paper side guides are the two green plastic guides on the left and right sides of the paper tray.
- The paper length guide is the green plastic tab located at the front center of the paper tray.
- Make sure the triangular marks (3) on the paper side guides (2) and paper length guide (1) line up with the mark indicating your paper size.
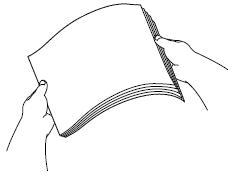
7. Fan the stack of paper well to avoid jams and misfeeds.
- Make sure the paper is not curled.
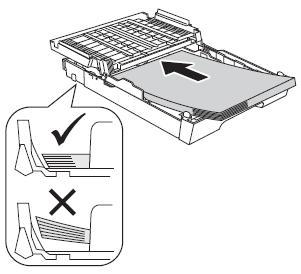
8. Gently put the paper in the tray print side down and top edge first.
- Make sure the paper is flat in the tray.
- Make sure the back edge of the paper is not touching the back of the paper tray.
9. Gently adjust the paper side guides to fit the paper.
- Use both hands to adjust the paper side guides.
- Make sure the paper side guides touch both sides of the paper stack.
- Be careful not to push the paper in too far; it may lift at the back of the tray and cause feed problems.
10. Close the output paper tray cover.
- Make sure the paper is flat in the tray and below the maximum paper mark (1).
- Overfilling the tray may cause paper jams.

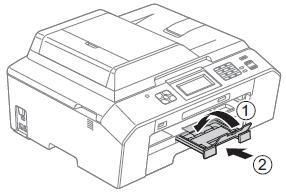
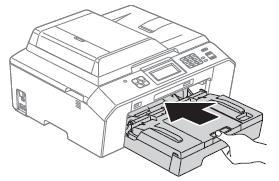
11. Slowly push the tray back into the machine.
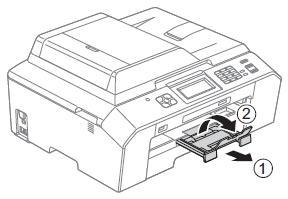
12. While holding the tray in place, pull out its paper support (1) until it clicks into place then unfold its paper support flap (2).
SETTING THE PAPER SIZE
To change your Brother machine's Paper Size setting, follow these steps:
1. Press MENU.
2. Press the UP OR DOWN ARROW to display General Setup.
3. Press GENERAL SETUP
4. Press the UP OR DOWN ARROW to display Paper Size.
5. Press PAPER SIZE.
6. Press the UP OR DOWN ARROW to display Letter, Legal, Ledger, A4, A5, A3, Executive, or 4' x 6' (10 x 15 cm).
7. Press the option you want.
8. Press STOP/EXIT.
MAKING COPIES
To make copies, follow these steps:
1. Press the COPY key to illuminate it.
2. Do one of the following:
- Place the document you want to copy face up in the Automatic Document Feeder (ADF).
- Place the document you want to copy face down on the flat scanner glass.
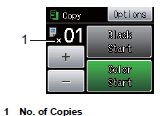
3. Use the dial pad or press + and on the display to select the number of copies you want.
4. Do one of the following:
- Press the gray key labeled BLACK START to make a black and white copy.
- Press the green key labeled COLOR START to make a color copy.
If the problem continues, Check the warranty status of your machine by clicking on the Machine Warranty Calculator. If in warranty, contact Brother Customer Support or locate a Brother Authorized Service Center to schedule product replacement or repair. If out of warranty, locate a Brother Authorized Service Center. Repair fees might apply for out-of-warranty products.